Introduction
In this tutorial, we will explore the Interaction Overview Diagram by interpreting a specific example and providing a step-by-step guide to creating your own. This type of diagram helps visualize the flow of interactions within a system, making complex processes easier to understand.
Problem Description for the Interaction Overview Diagram
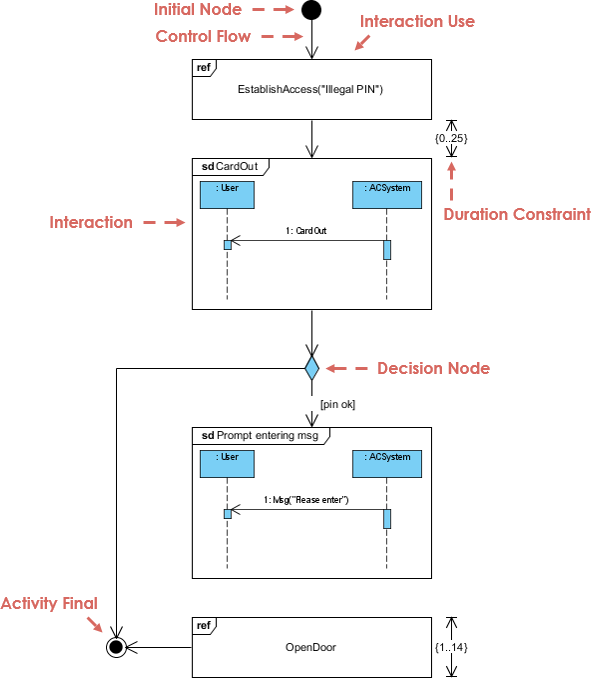
The interaction overview diagram illustrates a critical process in a card access system, specifically focusing on how users interact with the system when attempting to access a card. The primary problem addressed by this diagram is the handling of user authentication through a PIN entry system, which includes potential errors such as entering an illegal or incorrect PIN.
Context
In secure environments, access control is vital to ensure that only authorized users can retrieve sensitive information or gain entry to restricted areas. The system must effectively manage user interactions to maintain security while providing a smooth user experience.

The objective of the interaction overview diagram is to provide a comprehensive visualization of the user interaction process within the card access system. It aims to clarify how the system responds to various user inputs, manage errors effectively, and maintain security protocols while ensuring a seamless user experience. By analyzing this diagram, stakeholders can identify potential weaknesses in the current process and implement improvements to enhance both usability and security.
Understanding the Concepts
- Initial Node: This marks the starting point of the interaction flow.
- Control Flow: Arrows indicating the direction of the flow, showing how activities are connected.
- Interaction Use: Represents the invocation of a specific interaction or sub-process (e.g., “EstablishAccess(‘Illegal PIN’)”).
- Duration Constraint: Indicates the time constraints associated with certain interactions (e.g., 0.25 seconds).
- Decision Node: A branching point in the flow where a decision is made (e.g., prompting for a PIN).
- Activity Final Node: Marks the end of the interaction process.
Diagram Interpretation
The provided diagram illustrates a sequence of interactions in a system for accessing a card. Here’s a detailed breakdown:
- Initial Node: The process begins here, indicating the start of the interaction.
- Interaction Use: The first action is to establish access. If an “Illegal PIN” is entered, the system will trigger the next steps.
- Control Flow: The flow moves to the next interaction represented by sd CardOut, where:
- User and ACSystem are involved in the interaction.
- The duration for this interaction is constrained to 0.25 seconds.
- Decision Node: After the card is out, the system prompts the user to enter a PIN:
- If the PIN is entered correctly, the flow continues; otherwise, it redirects back for re-entry.
- Activity Final Node: Once the correct PIN is entered, the process concludes with “OpenDoor,” indicating successful access.
Step-by-Step Guide to Creating an Interaction Overview Diagram
- Define Your Objectives:
- Determine the purpose of your diagram and identify the interactions you want to illustrate.
- Identify Key Components:
- List all significant interactions and processes involved in your scenario.
- Establish Relationships:
- Define how these components relate and the sequence in which they occur.
- Choose a Diagramming Tool:
- Use software like Visual Paradigm, Lucidchart, or draw.io for creating your diagram.
- Design the Diagram:
- Start with the Initial Node to indicate where the process begins.
- Use arrows to represent Control Flows between interactions.
- Add Interaction Uses for specific actions within the process.
- Incorporate Decision Nodes where choices are made, and label the conditions.
- Include Duration Constraints to indicate timing for each interaction.
- Add Final Nodes:
- Mark the conclusion of the process with an Activity Final Node.
- Review and Refine:
- Ensure the diagram accurately represents the flow of interactions. Seek feedback from peers to identify any areas for improvement.
- Deploy Your Diagram:
- Share your diagram with stakeholders or integrate it into documentation to enhance understanding of the process.
Conclusion
Creating an Interaction Overview Diagram is a powerful way to visualize complex interactions within a system. By following this tutorial, you can effectively design your own diagrams, helping to clarify processes and improve communication among team members. Utilize tools like Visual Paradigm to bring your diagrams to life and enhance your project outcomes.
The objective of the interaction overview diagram is to provide a comprehensive visualization of the user interaction process within the card access system. It aims to clarify how the system responds to various user inputs, manage errors effectively, and maintain security protocols while ensuring a seamless user experience. By analyzing this diagram, stakeholders can identify potential weaknesses in the current process and implement improvements to enhance both usability and security.
