Introduction
A class diagram is a vital component of the Unified Modeling Language (UML) that visually represents the structure of a system. In this tutorial, we will delve into how to utilize a class diagram to model the architecture of a car. We will explore its purpose, benefits, and essential guidelines for creating effective class diagrams.
Purpose of Class Diagrams
Class diagrams serve several critical functions:
- Visual Representation: They provide a clear graphical structure that simplifies the understanding of relationships and attributes within the system.
- Documentation: Class diagrams serve as a comprehensive documentation tool for the system’s components, enhancing communication among stakeholders.
- Design Blueprint: They act as blueprints for system design, aiding developers in grasping the system’s architecture before implementation.
Benefits of Using Class Diagrams
Utilizing class diagrams offers numerous advantages:
- Clarity: They illuminate complex relationships and interactions within the system, making it easier to comprehend.
- Code Generation: Many development tools can automatically generate code from class diagrams, expediting the development process.
- Easy Modifications: Changes can be visualized and communicated effectively, facilitating improved planning and design.
- Enhanced Communication: Class diagrams foster better communication among team members and stakeholders by providing a shared understanding of the system.
Guidelines for Creating a Class Diagram
1. Identify Classes
Begin by determining the main entities within your system. For modeling a car structure, key classes might include:
- Car: The main entity in the diagram.
- Engine: A crucial component of the car.
- GearBox: Represents the car’s transmission system.
- Body: The physical structure of the car.
- Wheel: The wheels of the vehicle.
- Brake: The braking system.
2. Define Attributes
Each class should have its own attributes (properties). For example:
- Car:
registrationNum: Identifier for the car.year: Year of manufacture.licenseNumber: Legal registration number.
- Engine:
capacity: Size or volume of the engine.numberOfCylinders: Total number of cylinders.
- GearBox:
gearRatio: Ratio of gears.currentGear: The gear currently in use.
- Wheel:
width: Width of the wheel.diameter: Diameter of the wheel.
- Brake:
- Attributes may include types and performance metrics, though specifics are not detailed in the diagram.
3. Specify Operations
Every class can have methods (functions) that define its behavior. For example:
- Car:
move(): Method to move the car.stop(): Method to stop the car.
- Engine:
start(): Method to initiate the engine.accelerate(): Method to increase speed.
- GearBox:
shiftUp(): Method to change to a higher gear.shiftDown(): Method to change to a lower gear.
- Wheel:
turn(): Method for turning the wheel.apply(): Method to apply brakes.
Relationships
Associations
The lines connecting classes represent associations, indicating how classes relate to each other:
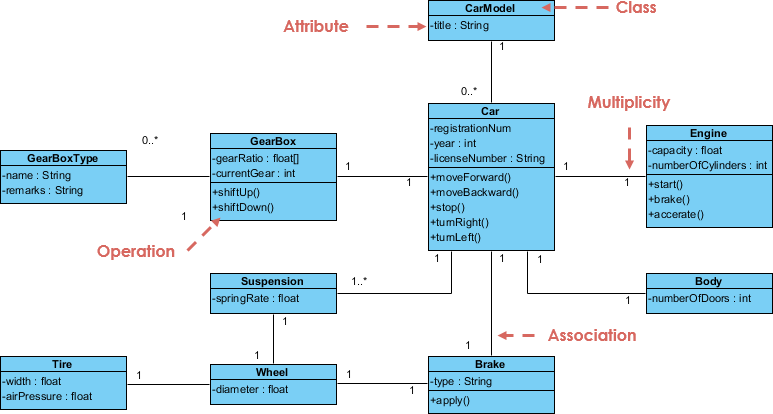
- Car to Engine: A car has exactly one engine (1-to-1 relationship).
- Car to Wheel: A car has multiple wheels (1-to-many relationship).
- Car to GearBox: A car has one gearbox (1-to-1 relationship).
Multiplicity
The numbers near the associations indicate multiplicity:
1signifies one instance.*(asterisk) indicates many instances (zero or more).
For instance, the Car class is associated with multiple Wheel instances, typically four in a standard vehicle.
Example Class Diagram Representation for a Car Structure
Here’s a simplified class diagram representing the structure of a car:

Interpretation Summary
The class diagram visually represents the structure of a car system, showcasing how various components interact with one another. It illustrates that a Car is composed of an Engine, a GearBox, multiple Wheels, and potentially a Brake system. Each class has specific attributes that detail its characteristics and operations that define its behavior.
Practical Implications
This diagram serves as a guide for developers in implementing the car system by providing a clear understanding of the system’s architecture. It helps identify necessary classes and their relationships, simplifying the planning process for software development, maintenance, and enhancements in automotive applications.
By analyzing the class diagram in this manner, stakeholders can ensure that all essential components are represented and that their interactions are well-defined, leading to a more robust system design.
Conclusion
Using a class diagram to represent a car structure provides a systematic approach to understanding and designing automotive systems. By following guidelines for identifying classes, defining attributes, establishing relationships, and specifying operations, you can create a clear and effective class diagram that serves as a valuable resource for development and communication.
Feel free to apply these concepts to your projects to enhance clarity and streamline the development process!
- UML Class Diagram Tutorial – Visual Paradigm
- Class Diagram Tutorial – Visual Paradigm
- What is Class Diagram? – Visual Paradigm
- Beginner’s Guide to Class Diagrams – Visual Paradigm Blog
- How to draw a Class Diagram in UML – Visual Paradigm
- Class Diagram – Visual Paradigm Community Circle
- Class diagram in Visual Paradigm
- How to draw a Class Diagram in UML (PDF) – Visual Paradigm Community Circle
- Discover the Ultimate Free Class Diagram Tool with Visual Paradigm
